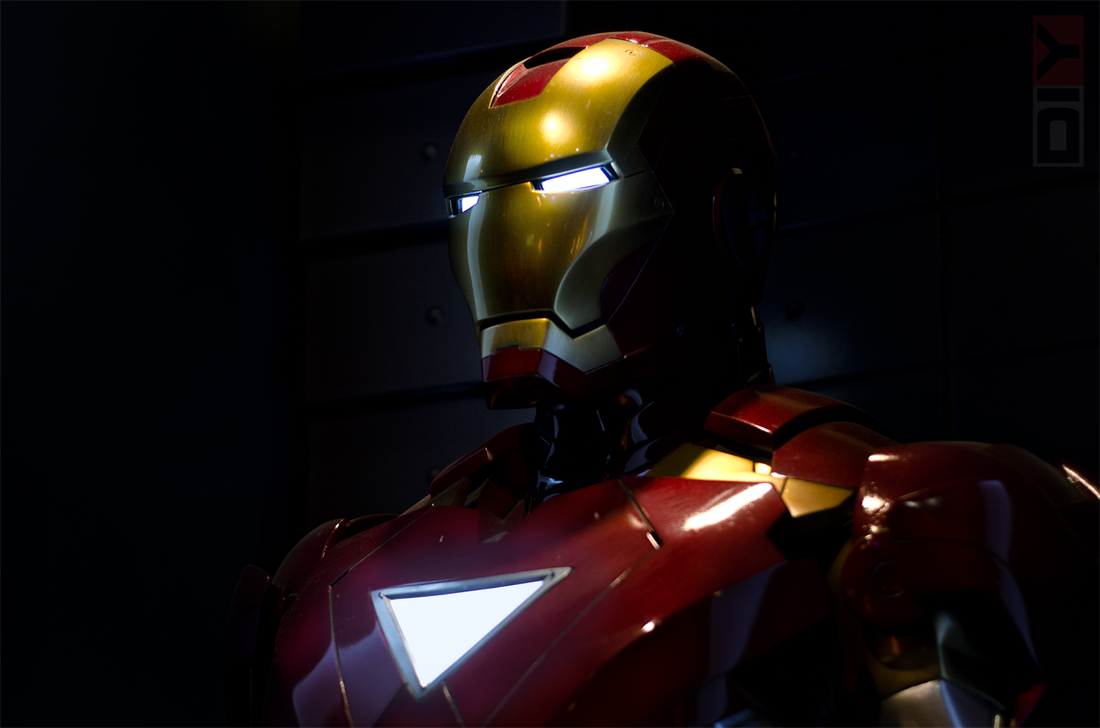
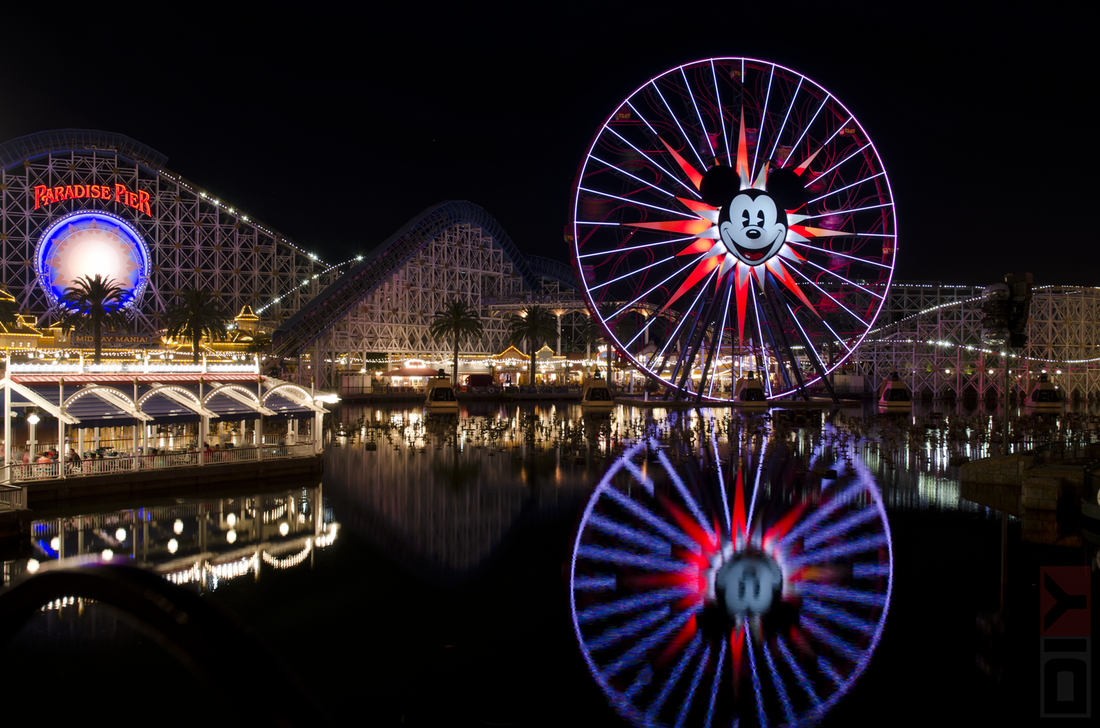
The last time I visited Disneyland was about thirteen years ago while California Adventure was still under construction. I gotta say, since then, Disneyland has gone through some slight changes; either that or I just don't remember what it used to look like. This past weekend though, me and the girlfriend went to both parks for the last trip of our summer adventure (which was all filmed with the gopro....video coming soon!). Cali adventure was pretty cool ,despite the roller coaster being closed during the day -___- but in all honesty, I really wanted to go to Disneyland to check out the iron man exhibit. So...check off the list and take a look at the pics! check out the lifestyle page for more pics!
0 Comments
There are many ways to fix the contrast levels of your pictures but I'm going to show you two simple methods including my own method of fixing/applying contrast to images. I mainly do this to my car pictures but occasionally I do this on my portraits and my flower/nature pictures. Feel free to experiment and see what works for you and hopefully these methods will work for you. So here we have our stock image. As always, I try to get a good exposure that is balanced in all areas so I don't have to heavily edit/fix in post. I'm using Photoshop so for those of you using any other image editing software, hopefully you could match these settings/actions. Applying the usual brightness/contrast adjustment you could see that the blacks/shadows and colors are brought out more and that white haze you see from the stock image is minimized. You could do this by going to image>adjustments>brightness/contrast. From there you could set the brightness and contrast levels to your liking. Here's my method of applying contrast. I don't like to exaggerate colors if there isn't much contrast between the subject, lighting, and background. I added a gradient map via adjustment layer panel. You can do this by going to Layer>New Adjustment Layer>Gradient Map. I usually use black to white but depending on your image, you'll have to find the right amount of contrast between black and white; exploring other settings doesn't hurt either. XD It's always up to personal preference on how you want the image to turn out. Keep in mind though that if you stack on effect after effect on a single layer and you find that your picture is looking ugly or not to your liking, you probably won't be able to backtrack and go back to where you want to start over; in other words, work in layers. Also, don't expect to save your image if it was crappy to begin with. Spend time and adjust your camera so that you can take a balanced exposure. Don't be afraid to review and check your picture, and when in doubt, check the histogram. Hopefully this tutorial helped. For those of you who are getting into photography or who are lost whenever they want to post edit, here's a little start to fixing your pictures. Anyways, stay tuned for more tutorials in the future and be sure to like the facebook page!
So recently I had a chance to go down to the local Arboretum to take a few shots of their orchids. One of you asked if I could hurry up and make a tutorial already on how to edit flower pictures...yaaay flowers! anyways, so if you don't have photoshop, hopefully whatever you're using has the capability to edit the tonal curve of the image. STEP 1: I make sure to take a well/evenly balanced picture (USE YOUR HISTOGRAM) so that I could spend less time correcting, and more time editing in post. Here's the stock picture STEP 2: Right off the bat I added a vignette effect using a brush to add a little contrast and to also make the orchids stand out a little more from the already blurred background. Step 3: I then changed the color balance in the mid-tones of the picture in order to make certain colors pop, and to also make the colors a little more vivid, not saturated. Finally, I adjusted the curves to give the picture an overall dramatic look, but not too much.
Being stuck with nothing to do all day, I headed on out to the Los Angeles Arboretum for some pictures of their orchids and carnivorous plants, mainly orchids. I always enjoy taking pictures of nature, but orchids are definitely my favorite, plus I order large prints of my pictures to give as gifts.....saves money and time. I only brought my 50mm, speedlight, and a remote trigger as I didn't want to be carrying around so much gear just for a few pictures and I knew exactly how I wanted my pictures to be like. I took advantage of the greenhouse light (which made the sunlight soft) for ambient lighting while my speedlight was the main source of light. I kept going in and out of the greenhouse because it was very humid compared to the outdoor weather but all in all, it was a good day.
check out the nature page for more pictures, and stay tuned for a little tutorial on shooting flowers. I recently had a chance to do a photoshoot with Jason from CipherAuto, and his Mustang, a supercharged 5.0 beast. We met at a carshow in Fullerton and from there we set up a date to do a shoot. Jason's Mustang is VERY clean, the paint is smooth, the engine bay is spotless, even the wheels are free of dust and dirt; a show car as well as a track car. The theme for this shoot was obviously strobe/flash. Shooting/editing took a little long since I was trying to figure out how to make each picture eye catching while using a single yet small light source to show details.
Check out the Autos page as well as CipherAuto's website for great deals on seats/brackets It's been a while since something has been posted, but finally! We're back at it with another tutorial for you photoshop editors. So for most of you, taking pictures under artificial light (with no flash) may seem a little tricky because you have to determine how long the shutter has to stay open, your metering, iso, etc. The only thing I can say is practice makes perfect, and even I am far from it. But here's a few tips/tricks to help you edit your pictures under artificial lighting by applying some effect in photoshop. So here we have a nice MR2 that I saw at a local car meet. I used the "bulb" setting for my exposure time with a aperture of f/6, iso 200. With the bulb setting I was able to pull off this picture without blowing out my subject, however there are a few spots in the rear that show reflection as well as some underexposed portions of the car. to start off, I lit up the front fender, middle, and the wheel; basically the front portion, in order to balance out the lighting of the subject. You want to make sure you work with layers rather than stacking your filters/effects on one single layer as it is easier to go back and fix your mistakes. After lighting, I cloned out the lines in the wall, as well as the shadow on the ground so that the main focus is the car. I also brushed out the light reflections to make the reflections less harsh. I then edited the tonal curve in order to bring our more contrast/detail in the car as well as to separate the car from the background, giving that lighted up look. A few tips to keep in mind when shooting at night/low light settings; Always bring a tripod (you'll never know). Set your exposure to bulb. If you want more detail, then use a lower f/stop number. Be sure to work in layers in post edit.
HDR (High Dynamic Range) photography is a technique used to capture the tonal range of a subject (light/shadows), yielding more detail in the picture. There are a lot of ways to take HDR pictures, but here's a quick and simple way to make a HDR picture without the hassle of thinking too much. You can also try this out on a point and shoot camera if it has a shutter speed setting. So first things first. The whole process would be a lot easier if you have a tripod so that in post process or in camera process (if you prefer -_-) the multiple exposures line up perfectly without any ghosting. Also, be sure to NOT change your aperture or iso throughout the process, otherwise some pictures might come out sharper than the others, or more grainier than the others. Anyways, you're going to take more than one exposure in order to get the tonal range of the picture. Start off by taking a normal balanced exposure to get your middle tones. This was shot at 1/80s F/2 iso 200 The next step is to take a overexposed picture by slowing down your shutter in order to get the shadows of the subject/surroundings. Shot at 1/3s F/2 iso 200 After your overexposed picture, the last thing you'll need to cover is the Highlight/light range. For this, you're going to speed up your shutter in order to get the bright parts of your subject. Keep in mind you don't want to set your shutter speed too fast, otherwise you'll end up with a picture that looks like it was taken with your lens cap on. Shot at 1/100 F/2 iso 200 You're next step is either to combine all your exposures in your camera, or combine them using post processing software, such as photoshop. I chose photoshop because it obviously gives you more options to adjust the exposures individually. Take your time in post processing, don't think that just because you can add a lot of effects, it will fix your errors. Here's is the end result. You can see the detail in the tonal range from lights to shadows. Obviously this wasn't a very contrasty scene to begin with, but the end result comes out more detailed than a balanced exposure. Again, there are a lot of ways to do HDR photography so don't think that this is the primary way, everyone finds their own method. A good note that I found out is that the more exposures you have (ranging from little changes in the tonal range), the more detailed your end result will be, but be sure to look at your scene, the more contrast in light/shadow, the better HDR effect you'll see in the end.
With the holidays coming up, there's going to be plethora of opportunity to capture some savoring memories like your new dog, or your best friend yacking on his/her shoes. Whatever the case, there's a camera out there for you, but which one? If you want something that's more hands on than a point and shoot, then you have 2 options: a mirroless micro 4/3, or a dslr. Both types have their pros and somewhat cons but ultimately it's all about what you want out of the camera. Check out Digitalrev's article on both types of cameras, hopefully it will help you decide which one's for you.
http://www.digitalrev.com/article/dslr-or-mirrorless-camera-which/NTE4NzMxNDM_A So with a few projects coming along, we've decided to let you know about a new series of pictures we'll be taking in the coming months...but with a certain theme...WHICH IS! Only using a 50mm lens (which equates to about 80mm on our cropped sensor nikon cameras, for you photog geeks). Be on the look out for these pics as well as a few new tutorials to follow which will hopefully improve your photography skills/workflow, as well as your eye for creativity with a fixed lens?
For the some of you that own a Digital Single Lens Reflex camera....you've probably at one point or another wondered what the hell does aperture do. Bascically, you can control how much light enters your camera via aperture, which then leads to how sharp or soft your pictures come out. MIND BLOWN?! A lot of beginners make the common error of thinking shutter speed alone will do, or that leaving the camera in aperture priority will suffice. Learning to use the aperture of your lens as well as tweeking your shutter speed go hand in hand in taking good pictures. Of course, you'll never know until you go out and play around with your settings.
Check out the link for a tutorial on aperture: http://www.mir.com.my/rb/photography/fototech/apershutter/aperture.htm |